 Faucet Online
How Do You Install a Tub Spout Elbow the Right Way Without Leaks?
View Count:96 CategoryInstall
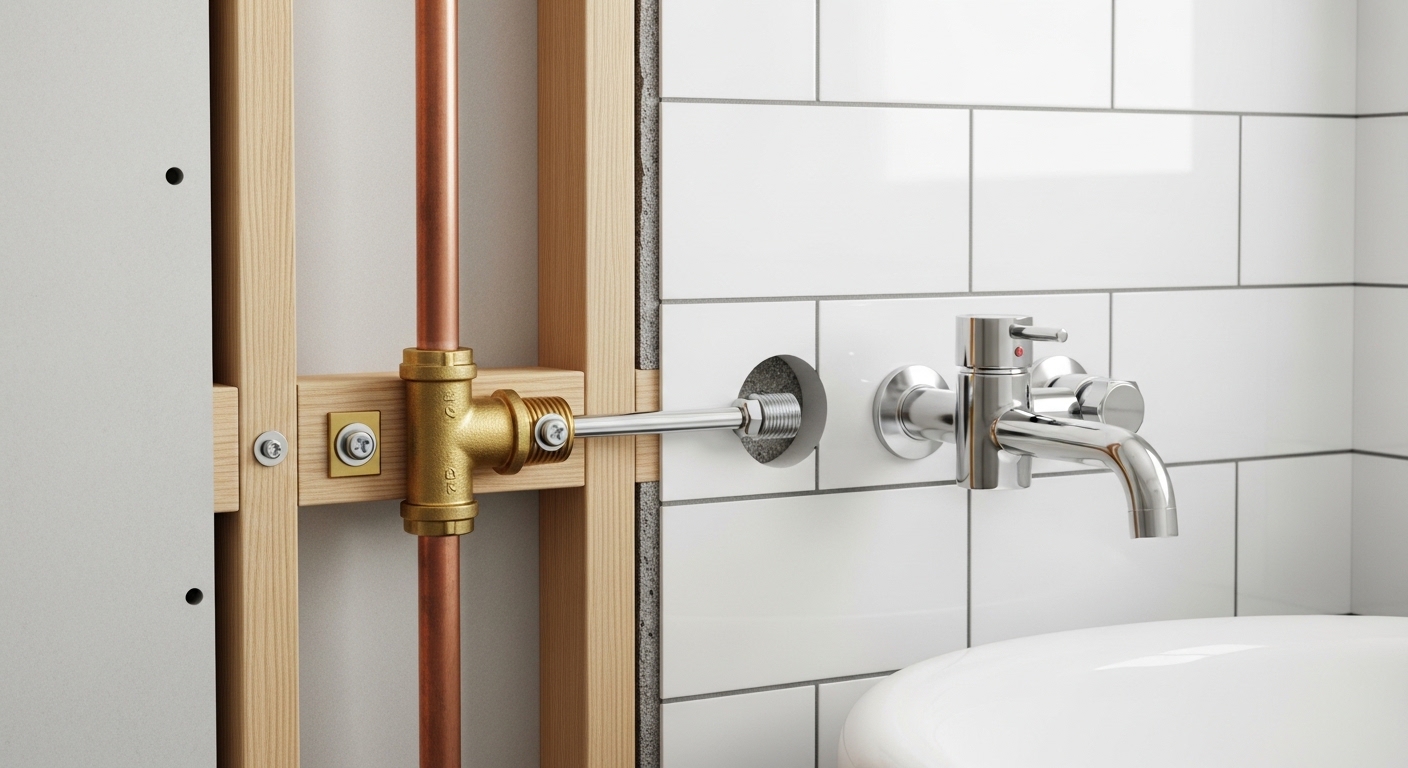
Learning how to install tub spout elbow fittings is one of those bathroom repairs that looks intimidating behind the wall but is genuinely straightforward once you understand what the elbow actually does. The tub spout elbow — sometimes called a drop-ear elbow, tub ell, or spout adapter — is the 90-degree fitting that turns your water supply pipe from running vertically inside the wall to sticking straight out horizontally so your tub spout can attach to it. If your spout is loose, leaking behind the wall, or you’re roughing in a new tub, this is the part doing the heavy lifting. Below I’ll walk you through it exactly the way I’d explain it to a friend standing in their bathroom with a wrench in hand.
What exactly is a tub spout elbow, and why does it matter?
A tub spout elbow is a 90-degree plumbing fitting inside your wall that redirects the water supply from vertical to horizontal so your bathtub spout can screw or slide onto it. It matters because it’s the anchor point for the entire spout — get it wrong and you’ll have a wobbly spout, a hidden leak inside the wall cavity, or a spout that sits crooked against the tile.
Most tub spout elbows are “drop-ear” or “wing” elbows, meaning they have two flat tabs (ears) with screw holes so you can fasten the fitting to a wood brace behind the wall. That bracing is what stops the spout from twisting every time someone grabs it to steady themselves getting out of the tub. The elbow is typically ½-inch, and it either accepts a threaded brass or galvanized nipple, or it’s a female sweat fitting for a copper stub-out. Knowing which one you have decides everything about the installation, so that’s where we start.
How do I know if I have a threaded or slip-on tub spout?
Look under your existing spout: if you see a small setscrew (usually a hex/Allen screw) on the underside near the wall, you have a slip-on spout; if there’s no setscrew, it’s a threaded spout that screws directly onto a nipple. This one detail determines which elbow and nipple setup you need.
- Threaded (screw-on) spout: The spout has internal ½-inch pipe threads (NPT) and spins onto a threaded brass nipple coming out of the elbow. Tightens clockwise, seals with thread sealant.
- Slip-on (setscrew) spout: The spout slides over a smooth ½-inch copper stub-out pipe and locks with a tiny setscrew underneath. No threading on the pipe itself.
Grab your old spout and check now, because buying the wrong style is the number-one reason people make three trips to the hardware store for one repair. If you’re replacing worn hardware anyway, it’s a good moment to look at your shower faucet knobs and trim so everything in the tub-shower valve matches in finish.
What tools and parts do I need to install a tub spout elbow?
You need a ½-inch drop-ear elbow, thread sealant (Teflon tape or pipe dope), a pipe wrench or adjustable wrench, and either a brass nipple (for threaded setups) or a copper stub-out and solder/push-fit connector (for slip-on setups). That’s the core kit; a rag and a bucket round it out.
| Part / Tool | What it does | Typical cost (2026) |
|---|---|---|
| ½” brass drop-ear elbow | Redirects supply pipe 90°, anchors spout | $4–$9 |
| ½” brass nipple (threaded setups) | Extends elbow out to the spout | $3–$6 |
| Teflon/PTFE tape or pipe dope | Seals threaded joints against leaks | $2–$5 |
| Adjustable or pipe wrench | Tightens elbow and nipple | $12–$25 |
| Push-fit connector (SharkBite-style) | No-solder copper/PEX joining | $6–$12 |
| Replacement tub spout | The visible fixture itself | $15–$60 |
If you’re on copper and comfortable soldering, you’ll save a few dollars over push-fit fittings, but for most DIYers a push-fit connector makes the job solder-free and reliable. Choose a brass or solid-metal elbow over plastic wherever the spout takes physical stress — brass simply holds threads better over the years.
How do you install a tub spout elbow, step by step?
Install a tub spout elbow by shutting off the water, dry-fitting the elbow so the spout face lands ½ inch proud of the finished wall, sealing the threads, fastening the elbow’s ears to a wood brace, then attaching the nipple and spout. Here’s the full sequence.
- Turn off the water. Use the bathroom shutoff or the main. Open the tub faucet afterward to bleed pressure and confirm the water is truly off before you touch anything behind the wall.
- Remove the old spout. For slip-on, loosen the setscrew and pull straight off. For threaded, turn the spout counterclockwise (a rag-wrapped pipe wrench gives grip without scratching). Inspect the elbow and pipe you expose.
- Check the elbow condition. If the old drop-ear elbow is cracked, corroded, or stripped, replace it. If it’s solid brass and in good shape, you may only need a fresh nipple and spout.
- Dry-fit for depth. This is the step people rush. Thread your nipple into the new elbow, hold the spout on, and confirm the base of the spout will seat flat against the finished wall while the spout face projects the manufacturer’s recommended distance. Most spouts want the elbow face set so the finished nipple extends the spec’d length — typically the spout should draw up snug with about half a thread of play left, never bottomed out hard.
- Seal the threads. Wrap PTFE tape 3–4 times clockwise around the male threads, or apply a bead of pipe dope. Do NOT put sealant on the spout’s own threaded connection if the manufacturer specifies an O-ring seal instead — over-taping can crack the spout.
- Fasten the elbow. Screw the drop-ear elbow’s ears to the wood cross-brace behind the wall so it can’t rotate. On new rough-ins this brace is nailed between studs; on repairs you may need to add one.
- Attach the nipple, then the spout. Thread the nipple into the elbow, then spin the spout on hand-tight plus a gentle wrench nudge until it points straight down and the base kisses the wall. For slip-on, slide over the stub-out and tighten the setscrew.
- Test. Turn the water back on slowly, run the tub, and watch the spout base and — if you have access — the elbow behind the wall for any drips. Check both hot and cold, and pull the diverter to confirm the shower still works.
Take your time on the dry-fit and the sealant. Those two steps are the difference between a spout that stays leak-free for a decade and one that seeps quietly inside the wall until you find soft drywall. Since you’ll have the water off anyway, this is also an easy time to confirm your supply connections are solid — our guide on how to connect faucet hoses to shutoff valves covers the upstream side of the system.
Why is my tub spout leaking behind the wall after installation?
A tub spout leaks behind the wall almost always because of a bad thread seal, a cracked elbow, or a spout that was over-tightened until it split the fitting. The fix is to pull the spout, inspect the elbow and nipple, and re-seal or replace whatever’s damaged — hidden leaks don’t heal themselves and will rot framing if ignored.
Common culprits, in the order I’d check them:
- Insufficient thread sealant. Too few wraps of tape, or tape wound the wrong direction so it unravels as you tighten. Re-wrap 3–4 turns clockwise.
- Cross-threaded joint. If the nipple went in crooked, the seal is compromised. Back it out and restart the threads by hand.
- Cracked plastic elbow or spout. Cheap plastic fittings crack under wrench pressure. Upgrade to brass.
- Wrong spout depth. If the spout bottoms out on the nipple before reaching the wall, it stresses the joint. Adjust nipple length.
- Failed O-ring (slip-on spouts). The rubber O-ring on the stub-out dries and shrinks. Replace it.
If you notice mineral crust building around the joint or on the spout tip, that hard-water scale can also work threads loose over time; our walkthrough on removing hard water deposits from faucet head buildup applies to tub spouts too and helps your new install last longer.
Threaded nipple vs. slip-on stub-out: which install is easier?
For most DIYers, the slip-on (setscrew) install is slightly more forgiving because it doesn’t rely on getting thread depth perfect, but the threaded install is more universally compatible and easier to seal reliably. Here’s how they stack up.
| Factor | Threaded nipple + screw-on spout | Slip-on stub-out + setscrew spout |
|---|---|---|
| Sealing method | PTFE tape / pipe dope on threads | O-ring on smooth copper pipe |
| Depth precision needed | High — nipple length is fixed | Lower — slide to fit, then set screw |
| Best for | Galvanized/brass supply, replacements | Copper rough-ins, new construction |
| Common failure point | Bad thread seal | Dried O-ring, loose setscrew |
| Tools | Wrench, sealant | Allen key, tube cutter |
Neither is objectively “better” — you install whichever matches the pipe already in your wall. The mistake is trying to force a screw-on spout onto a smooth copper stub-out (it won’t seal) or vice versa. Match the spout to the plumbing you have, and both methods are reliable for years. This same “check what you actually have first” logic applies to any elbow fitting on your property, including the outdoor garden hose faucet elbow if you’ve ever had to replace one of those.
Do I need to open the wall to replace a tub spout elbow?
Not always — if you’re only replacing the spout and the existing elbow is sound, you can do the whole job from the front with no wall access. You only need to open the wall if the elbow itself is cracked, corroded, unanchored, or you’re roughing in new plumbing where no elbow exists yet.
For a front-only spout swap, you work entirely through the spout opening: remove the old spout, seal fresh threads or replace the O-ring, and reattach. If you determine the elbow is bad, you’ll typically need an access panel — either behind the wall in an adjacent closet, or by cutting a neat drywall opening you’ll patch afterward. When the elbow isn’t anchored and spins freely, opening the wall to fasten those drop-ear tabs to a brace is worth the extra hour; an anchored elbow is what keeps the spout from loosening every time it’s bumped.
How long does it take and what does it cost to DIY?
A front-only tub spout and elbow refresh takes about 30–60 minutes and costs $20–$75 in parts; a full behind-the-wall elbow replacement with access panel work runs 2–4 hours and $40–$120 in materials. Hiring a plumber for the same work typically runs $150–$400 depending on wall access and your region.
The DIY math is compelling for a straightforward spout-and-elbow job, and it’s genuinely within reach for most homeowners with basic tools. Save the plumber for situations where the supply pipe itself is damaged, you find galvanized corrosion deep in the wall, or the leak has already caused framing rot that needs assessment. For the fixture-level work described here, you’ll come out well ahead doing it yourself.
FAQ
Can I use plumber’s tape on a tub spout elbow?
Yes — wrap PTFE (Teflon) plumber’s tape 3–4 times clockwise around the male threads of the nipple and elbow before assembling. Avoid over-taping and never bottom the spout out hard against the fitting, since excess force plus a thick tape wad can crack the spout or elbow. For slip-on spouts, the seal comes from an O-ring rather than tape.
What size is a standard tub spout elbow?
Standard residential tub spout elbows are ½-inch, using either ½” NPT threads (for brass/galvanized nipples) or ½” copper sweat/slip connections. The spout connection itself is almost always ½-inch as well. Always confirm your specific spout’s requirements, but ½” covers the vast majority of North American tubs.
Why does my new tub spout point up or sideways instead of down?
That happens when the nipple length is wrong — too short and the spout tightens before pointing down; too long and it over-rotates past straight. Adjust by changing the nipple length or adding a spacer so the spout seats snug against the wall exactly when it points straight down. Never leave a spout loose just to aim it correctly; fix the nipple depth instead.
Can a tub spout elbow be plastic, or does it have to be brass?
It can be plastic (CPVC/PEX systems often use plastic drop-ear elbows), but brass is strongly preferred wherever the spout takes physical stress because brass holds threads far better and resists cracking under wrench torque. If you’re replacing a leaking plastic elbow, upgrading to brass is a cheap, worthwhile improvement.
How do I stop my tub spout from leaking at the wall base?
First determine whether the leak is water escaping from the joint (a seal problem inside) or just splashback running down the outside. For a true joint leak, remove the spout, re-seal the threads or replace the O-ring, and confirm the spout seats flush without bottoming out. A bead of clear silicone around the top and sides of the spout base — leaving the bottom open so any water can escape and be seen — keeps splash out of the wall.
Do I need to shut off the whole house water to change a tub spout?
Only if your bathroom lacks dedicated shutoffs. Many tubs don’t have individual stops, so you’ll use the main house shutoff. After closing it, open the tub faucet to relieve pressure and verify the water is fully off before removing the spout. If your home has an accessible access panel with in-line valves for the tub, you can isolate just that fixture.
Author note: This guide was written by the WOWOW Faucet content team, drawing on hands-on installation and testing of tub spouts, drop-ear elbows, and tub-shower trim across chrome, brushed nickel, and matte black finishes. We install these fittings the same way we recommend you do — bench-testing thread seals and spout depth before publishing steps.
About WOWOW / brand credibility: WOWOW (www.wowowfaucet.net) designs and sells kitchen and bathroom faucets, tub and shower fixtures, and replacement parts direct to homeowners. Our fixtures are built to meet North American plumbing standards including cUPC certification and lead-free (NSF/ANSI 372) compliance, and our tub-shower hardware is backed by a limited warranty against manufacturing defects. Always confirm your local plumbing code and follow the specific installation instructions and warranty terms included with your fixture.
您好!Sign In