 Faucet Online
How Do You Install a Kitchen Faucet Cartridge Yourself Without Calling a Plumber?
View Count:110 CategoryInstall
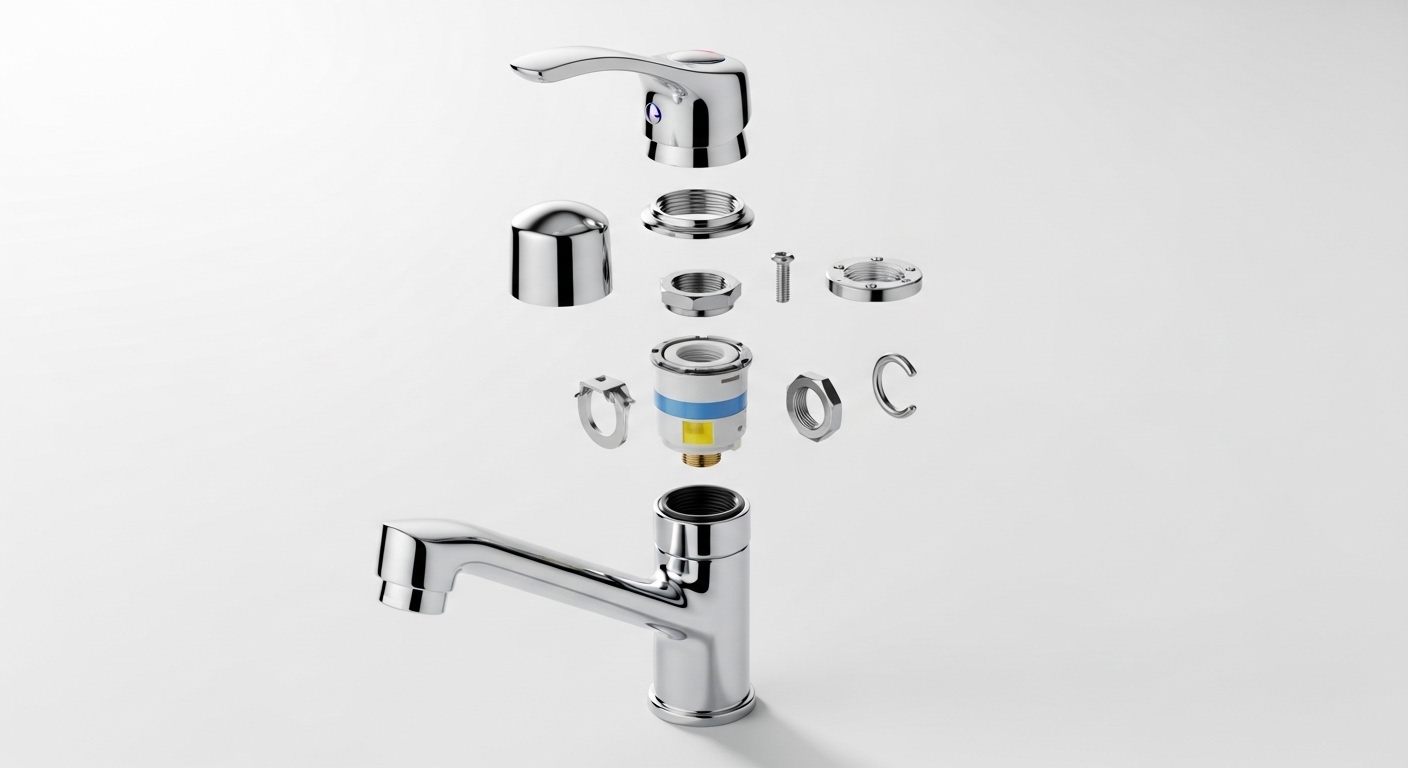
Learning how to install a kitchen faucet cartridge is one of the most satisfying, money-saving plumbing repairs you can do at home. When your single-handle faucet drips even after the handle is off, gets harder to turn, or mixes hot and cold poorly, the cartridge — not the whole faucet — is almost always the culprit. Instead of paying $150–$250 for a plumber to swap a $20 part, you can do it yourself with two or three basic tools in under half an hour. Below, I’ll walk you through exactly how, including the mistakes that trip people up and how to make sure the new cartridge is fully seated so you don’t spring a leak the moment the water comes back on.
What exactly is a faucet cartridge, and how do I know mine needs replacing?
A cartridge is the valve inside your faucet that controls water flow and temperature — replace it when your faucet drips constantly, is stiff to operate, leaks around the base of the handle, or won’t blend hot and cold correctly. It’s the heart of the faucet, and it’s a wear part, meaning it’s designed to be replaced periodically rather than lasting the life of the faucet.
Inside most modern single-handle kitchen faucets sits a ceramic-disc cartridge: two polished ceramic plates that slide across each other. When you lift the handle, the openings in the plates line up and water flows; when you swing the handle side to side, you’re mixing hot and cold. Over years of use, mineral scale from hard water, grit, and worn rubber seals cause those plates to leak or bind. Here are the tell-tale symptoms that point to the cartridge specifically:
- A drip that won’t stop even when the handle is fully off — worn seals inside the cartridge.
- Stiff or grinding handle motion — mineral buildup between the ceramic discs.
- Water seeping from under or around the handle — a failed O-ring or cracked cartridge body.
- Temperature that jumps or won’t reach full hot/cold — misaligned or damaged discs.
- Weak flow on one temperature only — partial internal blockage.
If your handle is loose or wobbly but the water behaves fine, that’s often just a set screw — not the cartridge. And if the faucet sputters or the spray is uneven, the problem may be downstream at the aerator instead. It’s worth ruling that out first; our guide on how to unclog a kitchen faucet aerator covers that five-minute fix so you don’t replace a perfectly good cartridge for nothing.
What tools and parts do I need before I start?
You need the correct replacement cartridge for your exact faucet model, an adjustable wrench or channel-lock pliers, an Allen (hex) key, and a flat-head screwdriver — plus white vinegar and plumber’s grease if you want the pro finish. That’s genuinely it for most jobs; you rarely need anything exotic.
The single most important item is the right cartridge. Cartridges are not universal — a Moen 1225 won’t fit a Delta, and a Delta won’t fit a WOWOW or a Kohler. Buying the wrong one is the number-one reason a “quick” repair turns into a second trip to the store. Here’s your prep list:
- Replacement cartridge matched to your brand and model number (check the underside of the spout, the box, or your original receipt).
- Adjustable wrench or channel-lock pliers to loosen the retaining nut.
- Hex/Allen key set — most handles are held by a tiny set screw.
- Flat-head screwdriver to pry the decorative cap and pop out the retaining clip.
- Needle-nose pliers or a cartridge-puller tool for stubborn cartridges.
- White vinegar to dissolve mineral scale on the faucet body.
- Plumber’s silicone grease to lubricate the new O-rings.
- A rag and a small bucket to catch residual water.
How do I find the exact cartridge that fits my faucet?
Match the cartridge by your faucet’s brand and model number, which is usually stamped under the spout, printed on the original box, or listed in your warranty paperwork. If you can’t find a number, remove the old cartridge first and take it to the hardware store to match it physically, or photograph it against a ruler.
Brand matters more than most people expect. Moen, Delta, Kohler, Grohe, and WOWOW each use their own cartridge geometry and tab alignment. If you own a Delta pull-down, our Delta pull-down kitchen faucet parts guide breaks down which cartridge and seat kits fit which models so you order right the first time. When in doubt, bring the old part with you — a five-minute detour beats installing a cartridge that’s 2mm too tall to seat.
How do I actually install the cartridge, step by step?
Shut off the water, remove the handle, unscrew the retaining nut or pull the retaining clip, extract the old cartridge straight up, insert the new one aligned to the same orientation, then reassemble and test. Follow these steps in order and don’t skip the shut-off — that’s the one that saves your kitchen from a geyser.
- Turn off the water supply. Reach under the sink and close both the hot and cold shutoff valves by turning them clockwise. No under-sink valves? Shut off the main. Then open the faucet to release pressure and confirm the water is truly off.
- Plug the drain. Drop in a stopper or lay a rag over the opening so a dropped screw or clip doesn’t vanish down the drain.
- Remove the handle. Pop off the decorative cap with a flat-head screwdriver to expose the set screw, loosen it with your hex key, and lift the handle straight up and off.
- Remove the retaining hardware. Depending on the design, you’ll either unscrew a dome-shaped retaining nut with your wrench, or pull a small horseshoe-shaped brass or plastic retaining clip out with needle-nose pliers. Set it somewhere safe.
- Pull out the old cartridge. Grip the cartridge stem with pliers and pull straight up with a slight twist. If it’s cemented in place with scale, don’t force it sideways — use a cartridge-puller tool made for your brand.
- Clean the housing. Wipe the cavity and soak away any mineral scale with a vinegar-dampened rag. A clean bore lets the new cartridge seat fully.
- Insert the new cartridge. Lightly grease the O-rings with plumber’s silicone grease, then lower the new cartridge in, aligning its keyed tab, flat, or notch to the same position the old one occupied. This orientation sets your hot/cold direction — get it backwards and hot will be on the wrong side.
- Reassemble in reverse. Reinstall the retaining clip or nut, slide the handle back on, tighten the set screw, and press the cap back into place.
- Restore water slowly. Open the shutoff valves gradually. Run the faucet on both temperatures, check for leaks at the handle and under the sink, and confirm hot and cold are on the correct sides.
What if the old cartridge is stuck and won’t come out?
If the cartridge won’t budge, it’s almost always seized by mineral scale — soak it with white vinegar or a calcium-lime remover for 15–20 minutes, then use a brand-specific cartridge-puller tool that grips and pulls it straight up with leverage. Never yank it sideways or pry against the faucet body, because you can crack the housing and turn a $20 repair into a full faucet replacement.
A stuck cartridge is common enough that it deserves its own playbook. We cover penetrating oils, heat, the twist-to-break-the-seal trick, and puller-tool technique in detail in how to fix a faucet cartridge that’s stuck. Work patiently — the scale that’s gluing it in place will release once it’s dissolved, and forcing it is how people end up needing a whole new faucet.
Which faucet brands make cartridge replacement easiest?
Moen and WOWOW are among the easiest for DIY cartridge swaps because they use widely available, well-documented cartridges and lifetime or long warranties that cover the part; Delta and Kohler are close behind. The table below compares what to expect from the major brands so you know what you’re getting into before you start.
| Brand | Typical Cartridge Type | Retainer Style | Approx. Part Cost | DIY Difficulty |
|---|---|---|---|---|
| Moen | 1225 / 1255 ceramic | Retaining clip + puller | $15–$30 | Easy–Moderate |
| WOWOW | Ceramic disc | Retaining nut | $10–$25 | Easy |
| Delta | Ceramic / ball valve | Bonnet nut + clip | $12–$35 | Easy–Moderate |
| Kohler | Ceramic disc | Retaining nut | $20–$40 | Moderate |
| Grohe | Proprietary ceramic | Threaded ring | $25–$50 | Moderate |
Notice that the cost swing is small — parts almost always land between $10 and $50 — so the real variable is availability and how the retainer is designed. Brands that use a simple threaded retaining nut (like WOWOW and Kohler) tend to be the most beginner-friendly because there’s no fiddly clip to fish out. If you’re shopping for a new faucet and want cartridge serviceability to be part of the decision, our roundup of the best kitchen faucets 2026 flags which models are easiest to maintain over the long haul.
How long does a cartridge last, and how do I make the new one last longer?
A quality ceramic-disc cartridge typically lasts 5–15 years, and the single biggest factor shortening that lifespan is hard water. You can dramatically extend it by descaling your faucet periodically, greasing the O-rings during installation, and installing a water softener or filter if you have very hard water.
Ceramic discs themselves are extremely durable — it’s the surrounding rubber seals and the mineral scale that build up on the discs that cause most failures. A few habits keep the new cartridge running smoothly:
- Descale regularly. Soak the aerator and wipe the handle base with vinegar every few months to keep scale from migrating into the valve.
- Grease the O-rings. A thin film of plumber’s silicone grease at install time keeps seals supple and the handle smooth for years.
- Operate gently. Slamming the handle to full-hot repeatedly wears the stops faster.
- Address hard water at the source. A softener or point-of-use filter protects every valve in the house, not just this one.
Hard water is the quiet killer of cartridges, so if you’re battling chalky white buildup, it’s worth tackling it head-on — our guide on removing hard water deposits from your faucet head shows how to clear existing scale and slow its return. Do that, and a $20 cartridge can easily outlast a decade of daily use.
When should I replace the whole faucet instead of just the cartridge?
Replace the whole faucet instead of the cartridge when the faucet body is cracked or corroded, the cartridge is discontinued and no compatible part exists, you’ve already replaced the cartridge recently, or the faucet is old and you want an upgrade — otherwise, a cartridge swap is almost always the smarter, cheaper fix. As a rule of thumb, if the repair costs more than half the price of a new faucet, replace the faucet.
That said, most single-handle faucets are worth saving. A cartridge is $10–$50; a decent new faucet is $100–$400 plus your installation time. The times a full replacement genuinely makes sense are when the base metal is pitting through, the spout swivel is worn out too, or the brand no longer sells parts. If you do decide to go all the way to a new fixture, the process is straightforward and we’ve documented it start to finish in how to change a faucet in your kitchen sink.
FAQ
Do I need to turn off the water to replace a kitchen faucet cartridge?
Yes, always. Close the hot and cold shutoff valves under the sink before you touch the cartridge, then open the faucet to relieve the remaining pressure. Skipping this step means water under full line pressure will spray out the instant you pull the cartridge. If your under-sink valves are stuck or missing, shut off the home’s main supply instead.
Can I use any brand of cartridge in my faucet?
No. Cartridges are brand- and often model-specific because the length, diameter, and alignment tabs differ. A Moen cartridge won’t fit a Delta, and even within one brand, models vary. Always match the exact replacement part number, or bring the old cartridge to the store to compare. Using the wrong cartridge either won’t seat at all or will leak.
Why is my faucet still dripping after I replaced the cartridge?
Usually one of three things: the new cartridge isn’t fully seated, its alignment tab is rotated wrong, or debris and old seals were left in the housing. Turn off the water, pull the cartridge, clean the cavity thoroughly, confirm the keyed tab lines up with the notch, and reseat it firmly. Also check that the retaining nut is snug — a loose retainer lets the cartridge lift slightly and drip.
How much does it cost to replace a kitchen faucet cartridge yourself?
The part typically costs $10–$50 depending on the brand, and you likely already own the tools — an adjustable wrench, hex key, and screwdriver. That’s a total of roughly $10–$50 for a DIY job versus $150–$250 if you hire a plumber, since labor is the bulk of a professional’s charge. It’s one of the highest-return home repairs you can do.
How do I know if it’s the cartridge or the aerator causing low water flow?
Unscrew the aerator at the tip of the spout and run the faucet. If flow returns to normal, the aerator was clogged with scale — clean or replace it. If flow is still weak with the aerator off, the restriction is deeper, often inside the cartridge or the supply lines. Cartridges more commonly cause dripping, stiff handles, and temperature problems than pure low flow.
How long does it take to install a kitchen faucet cartridge?
For most single-handle faucets, plan on 15–30 minutes once you have the correct replacement part in hand. First-timers or anyone dealing with a scale-seized cartridge should budget closer to 45 minutes. The actual swap is quick; the time variable is almost always how stubborn the old cartridge is to remove.
About the author: This guide was written by the WOWOW Faucet product and service team, drawing on years of hands-on faucet installation, repair, and warranty support. WOWOW designs and manufactures kitchen and bathroom fixtures engineered for easy, DIY-friendly maintenance. Our ceramic-disc cartridges are tested to industry durability standards for hundreds of thousands of open-close cycles, our faucets meet cUPC and NSF/ANSI lead-free requirements, and our kitchen faucets are backed by a limited lifetime warranty that covers the cartridge — so if a WOWOW cartridge fails within its warranty window, we replace it free. Always confirm your specific model’s compatible cartridge and warranty terms at www.wowowfaucet.net before ordering parts.
您好!Sign In