How to Retrofit Your Faucet to Use Less Water
View Count:338 CategoryBlog
Retrofitting your faucet to use less water is one of the simplest and most effective ways to conserve water in your home. With a few inexpensive upgrades, you can reduce your water usage by up to 30% or more—without sacrificing performance or convenience. Whether you’re motivated by environmental concerns or simply want to cut down on your utility bills, this guide will walk you through how to make your faucet more efficient step-by-step.
Why Save Water at the Faucet?
Most people don’t realize just how much water they waste at the sink. A typical bathroom faucet flows at 2.2 gallons per minute (GPM), which adds up quickly during activities like brushing teeth, washing hands, or shaving. In kitchens, it’s even more.
Retrofitting reduces the amount of water that comes out of your faucet without affecting the pressure. That means you can still rinse your hands or dishes effectively while using less water overall.
Saving water also means:
Lower utility bills (especially if you’re paying for both water and energy to heat it)
Reduced strain on local water supplies
Environmental benefits, including reduced energy use and greenhouse gas emissions
Step 1: Check Your Existing Flow Rate
Before making any changes, it’s helpful to know how much water your current faucet uses.
Here’s a simple way to test:
Place a measuring cup or container under your faucet.
Turn the faucet on fully for 10 seconds.
Measure how much water was collected.
Multiply that number by 6 to estimate gallons per minute (GPM).
If your faucet is flowing at over 1.5 GPM in the bathroom or over 2.0 GPM in the kitchen, there’s plenty of room for improvement.
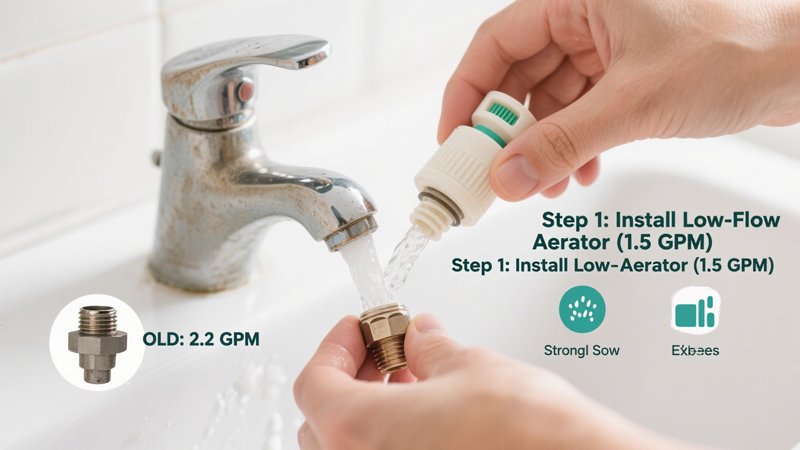
Step 2: Install a Low-Flow Aerator
The easiest and most cost-effective retrofit is replacing your faucet aerator. Aerators screw onto the tip of your faucet and mix air with water to maintain pressure while reducing flow.
Types of aerators:
Standard low-flow (1.5 GPM or less) – Great for bathrooms.
Ultra low-flow (0.5 to 1.0 GPM) – Ideal for sinks where water is used mainly for washing hands or brushing teeth.
Swivel or spray aerators – Great for kitchen sinks, allowing more flexibility while still conserving water.
Installation is easy:
Unscrew the old aerator (use pliers if needed, but be careful not to scratch the finish).
Clean the threads of the faucet spout.
Screw on the new aerator by hand.
Turn on the water to ensure proper flow and check for leaks.
Cost: Around $2 to $10 per aerator.
Savings: Up to 500 gallons of water per year per faucet.
Step 3: Use a Flow Restrictor
If your faucet doesn’t support standard aerators (e.g., designer faucets), you can use a flow restrictor disk instead. These small devices are installed inside the faucet or the supply line and limit how much water comes out, regardless of how far the handle is turned.
While a bit more involved to install than aerators, they still make a big difference—especially in households with multiple sinks.
Step 4: Fix Leaks and Drips
A dripping faucet might not seem like a big deal, but one drop per second can waste over 3,000 gallons of water per year. Before installing new parts, make sure your faucet is leak-free.
Here’s how to fix common issues:
Replace worn washers or O-rings
Tighten loose handles or connections
Use plumber’s tape for a better seal on threaded joints
If the faucet is old and the parts are difficult to find or replace, it might be more cost-effective to upgrade to a new, water-efficient model entirely.
Step 5: Upgrade to a WaterSense Certified Faucet
If you’re looking for a more comprehensive solution, consider replacing the faucet with one that’s WaterSense certified. These faucets use 1.5 GPM or less and are designed to save water without reducing performance.
WaterSense is a label backed by the U.S. Environmental Protection Agency (EPA), ensuring products meet rigorous efficiency and performance standards.
You’ll find WaterSense faucets in a range of styles and price points, and they can often be installed using the same fittings as your existing model.
Step 6: Install Motion or Touch Faucets (Optional)
Touchless or touch-activated faucets aren’t just convenient—they’re also effective at reducing unnecessary water use. These faucets automatically shut off when your hands move away, eliminating waste from accidentally leaving the faucet running.
While these models cost more upfront and require batteries or a power source, they’re a solid investment in high-traffic areas like kitchens and kids’ bathrooms.
Bonus Tips to Save Even More Water
Turn off the faucet while brushing teeth or shaving. This simple habit can save several gallons per day.
Capture cold water. Waiting for hot water? Place a bucket or container under the faucet and use that water for plants.
Avoid running water to rinse dishes. Instead, fill the sink or a basin for rinsing.
Return on Investment (ROI)
Most water-saving retrofits pay for themselves within months. Consider this:
A $5 aerator saving 0.5 GPM can save over 1,000 gallons of water per year.
If you’re heating that water, you’ll also save on energy costs.
Households can save $100+ annually on average just by updating faucet and shower fixtures.
These small changes make a big impact, especially when done across an entire home or apartment complex.
Final Thoughts
Retrofitting your faucet is a fast, affordable way to reduce your water use without sacrificing comfort or performance. Whether you’re motivated by environmental responsibility or simply want to reduce monthly bills, upgrading your faucet to use less water is a smart move that benefits everyone.
Start with a simple aerator swap and build from there. With just a few minutes of work, you can join the growing number of homeowners making sustainable choices—one drop at a time.
您好!Sign In