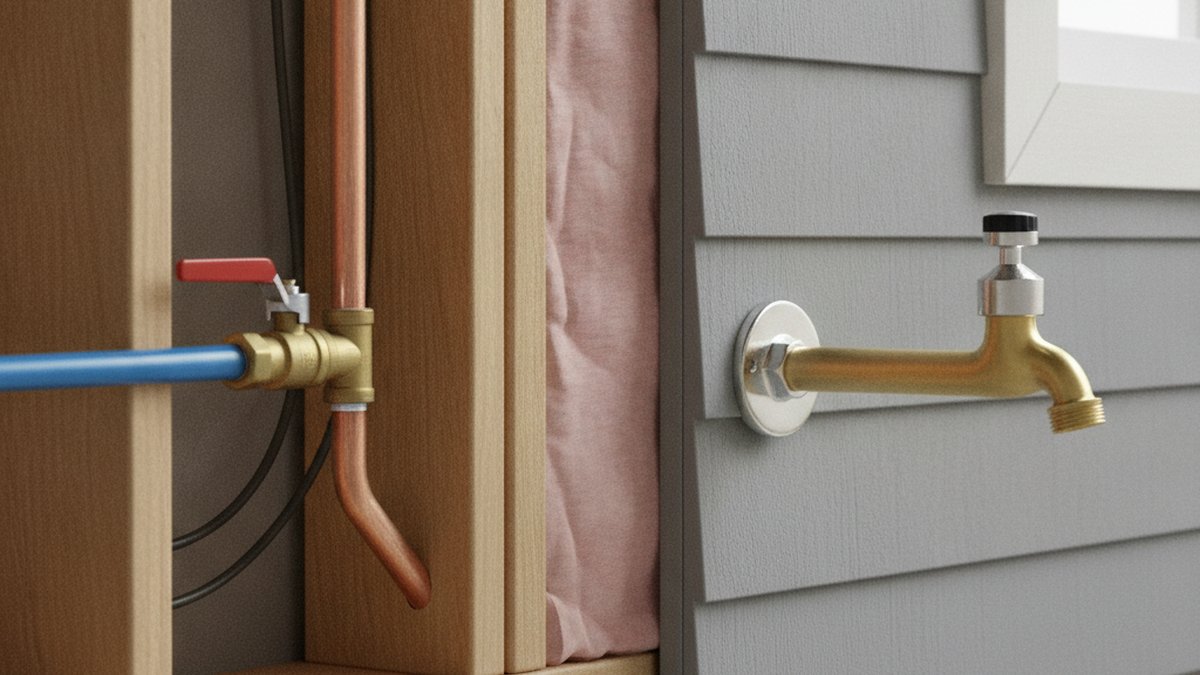
If you searched for an outdoor faucet installation diagram, you’re almost certainly staring at a bare exterior wall (or an old, dripping spigot) and trying to figure out what actually connects to what before you buy parts or pick up a torch. Good news: once you understand the five zones every diagram is really showing you, the whole job stops looking like plumbing magic and starts looking like a short parts list. Below we break down exactly what a proper diagram includes, which type of outdoor faucet you should install for your climate, and the step-by-step order that keeps you from cutting into drywall twice.
We’ll also cover the mistakes that cause 90% of outdoor faucet leaks (spoiler: it’s almost never the faucet — it’s the fitting behind it), how a frost-free sillcock changes the diagram, and what to check before you ever open a wall.
What does a standard outdoor faucet installation diagram actually include?
A standard outdoor faucet installation diagram includes five things, always in this order from inside to outside: (1) the cold-water source you’re tapping, (2) a dedicated shutoff valve, (3) the horizontal or angled pipe run to the exterior wall, (4) the wall or rim-joist penetration, and (5) the sillcock/hose bib itself with its threaded hose connection. Everything else on the drawing is just a fitting joining two of those zones.
Here’s what each zone means in plain terms:
- Cold-water source: A tee cut into an existing cold-water line — usually the nearest branch in a basement, crawlspace, or utility wall. The diagram shows a tee fitting here, never a splice into a hot line.
- Shutoff valve: A quarter-turn ball valve placed inside, right after the tee, so you can isolate and drain the outdoor line every winter without shutting off the whole house.
- Pipe run: The pipe carrying water to the wall. On the diagram this is a straight line with a length callout; in real life it’s copper, PEX, or (on older homes) galvanized steel.
- Wall penetration: The hole through the rim joist or siding. A frost-free sillcock diagram shows this section pitched slightly downward toward the outside so the barrel drains itself.
- The spigot: The visible faucet with a 3/4-inch hose thread (GHT) outlet and, ideally, a vacuum breaker on top.
If a diagram you find online is missing the shutoff valve or the downward pitch, it’s a shortcut drawing — don’t copy it. Those two details are what separate a spigot that survives a freeze from one that splits a pipe inside your wall.
Frost-free vs. standard sillcock: which does your diagram need?
If you live anywhere that freezes in winter, your diagram should show a frost-free sillcock, not a standard hose bib. The difference is the length of the barrel: a frost-free faucet moves the actual shutoff valve 6 to 12 inches back inside the heated wall, so water never sits in the exposed exterior portion where it can freeze and burst.
A standard sillcock closes water right at the handle, on the cold outside face of the wall — fine in Florida, a liability in Ohio. Here’s how the two compare on a diagram and in the field:
| Feature | Frost-free sillcock | Standard hose bib |
|---|---|---|
| Where it shuts off water | 6–12″ inside the heated wall | Right at the exterior handle |
| Best climate | Anywhere with freezing winters | Frost-free / mild climates only |
| Required pitch on diagram | Slight downward slope to the outside (self-draining) | Level is acceptable |
| Built-in vacuum breaker | Usually yes | Often add-on |
| Typical barrel length | 6″, 8″, 10″, 12″, 14″ | ~2–3″ |
| Price range | $18–$45 | $8–$20 |
| Winter shutoff needed? | No interior valve drain-down if pitched right | Yes, must shut off + drain |
One sizing note people miss: for a frost-free faucet, the barrel must be longer than your wall is thick. Measure from the interior pipe stub to the outside face of the siding, then pick the next barrel length up. A 6-inch faucet on an 8-inch wall shuts off in cold territory and defeats the entire point.
What parts and fittings does the diagram tell me to buy?
A complete outdoor faucet diagram is really a shopping list in disguise: it names every fitting you need to get from the cold-water tee to the spigot. For a typical copper or PEX run into a rim joist, that list is short and predictable.
- The sillcock or hose bib (frost-free, correct barrel length, with vacuum breaker).
- A tee fitting to tap the existing cold line (copper sweat tee, PEX tee, or push-to-connect).
- A quarter-turn ball valve for the interior shutoff.
- Pipe for the run — 1/2″ copper, 1/2″ PEX, or 3/4″ depending on the faucet inlet.
- A threaded or sweat adapter to connect your pipe type to the faucet’s inlet. This is where a copper faucet adapter matters — matching the faucet’s MIP/FIP or sweat inlet to your line is the single most common reason a “finished” install still weeps at the joint.
- Mounting screws + exterior caulk for the flange, and an escutcheon to seal the wall penetration.
- Teflon tape or pipe dope for every threaded joint.
Notice most of that list is fittings, not the faucet. That’s the real lesson of reading a diagram: the faucet is the cheap, easy part — the connections behind it are what you have to get right. If you’re extending from a supply that’s just barely reaching, don’t kink or over-stretch it; our guide on what to do when your faucet supply line is too short walks through safe ways to add length without stressing the joint.
How do I install an outdoor faucet from the diagram, step by step?
To install an outdoor faucet from a diagram, work from the water source outward: shut off and drain the house water, tap the cold line, run pipe to the wall, drill the penetration, mount and connect the spigot, then pressure-test. Rushing the order — for example, drilling the hole before you know where the interior pipe lands — is what forces people to patch drywall twice.
Here’s the sequence a diagram implies:
- Shut off the main and open a low faucet to drain the lines. No water should be in the pipe you’re cutting.
- Locate the tie-in point on a cold-water line as close to the exterior wall as possible. Shorter run = fewer fittings = fewer leak points.
- Cut in the tee and install the ball valve right after it. Leave the valve closed for now.
- Drill the pilot hole through the rim joist or wall from the inside out, angling very slightly downward toward the exterior so a frost-free barrel self-drains. Then open the hole to the barrel diameter (usually 1″ to 1-1/4″).
- Slide the sillcock barrel through and secure the exterior flange with stainless screws. Bead exterior-grade caulk behind the flange before you tighten.
- Connect the faucet inlet to your pipe run using the correct adapter, Teflon tape on threads, and either a soldered or push-to-connect joint.
- Open the ball valve slowly and pressure-test. Watch every joint for 10 minutes, then run the faucet at full flow and check again.
If the new faucet trickles instead of gushing, the diagram isn’t the problem — flow is. Undersized pipe, a half-open valve, or a clogged vacuum breaker are the usual suspects; our breakdown of why faucet water pressure is too low covers how to trace it down fast.
Where should the outdoor faucet actually go on the wall?
Place the outdoor faucet 12 to 18 inches above finished grade, near a corner where an interior cold-water line is close by, and away from windows, dryer vents, and electrical. The single biggest factor is proximity to existing plumbing — every extra foot of pipe run adds fittings, cost, and potential leak points.
A few practical placement rules that a flat diagram won’t tell you:
- Height: High enough to slide a bucket or watering can under the spigot, low enough that the handle isn’t awkward. 12–18″ above grade is the sweet spot.
- Backing: Mount into solid framing (rim joist or a stud), never into hollow siding alone. A wobbly faucet cracks its own seal over time.
- Drainage direction: The barrel must pitch down and out. If your wall forces an awkward angle, note it on your diagram before drilling.
- Hose reach: Think about where the hose actually needs to go — garden, driveway, car. A faucet on the wrong corner means dragging 50 feet of hose around the house.
Once the spigot is in, most people immediately screw on a hose and discover the angle is awkward or the hose kinks against the siding. That’s what a garden hose faucet elbow solves — it redirects the connection downward so the hose doesn’t fight the wall or strain the spigot threads.
What are the most common outdoor faucet installation mistakes?
The most common mistakes are skipping the interior shutoff valve, installing a frost-free faucet without a downward pitch, using a barrel that’s too short for the wall, and forgetting a vacuum breaker. Every one of these passes the “it turns on” test and fails the “survive winter and code inspection” test.
Here’s what actually goes wrong, and why the diagram exists to prevent it:
- No dedicated shutoff: Without an interior ball valve, you can’t isolate the outdoor line for repairs or winterizing — you shut off the whole house instead.
- Level or upward pitch on a frost-free: Water can’t drain out of the barrel, so it freezes and splits the pipe inside your wall, where you won’t find the leak until spring.
- Barrel too short: The shutoff seat ends up in the cold zone. Functionally, you’ve installed an expensive standard hose bib.
- No vacuum breaker / backflow preventer: Required by most plumbing codes to stop contaminated hose water (fertilizer, pool chemicals) from siphoning back into your drinking water.
- Over-tightened plastic or thread damage: Cross-threading the hose connection or the inlet adapter creates a slow weep that ruins the joint. Hand-tight plus a quarter turn, with tape, is the rule.
If you’re tapping into PEX rather than copper, the tie-in technique differs slightly — crimp or push-fit instead of solder. The same care that goes into a proper shower valve rough-in with PEX applies here: support the pipe, avoid sharp bends, and don’t rely on the fitting to hold the run in place.
Do I need a permit or backflow preventer for an outdoor faucet?
In most U.S. jurisdictions, adding a new outdoor faucet requires a backflow preventer (vacuum breaker) by code, and many areas require a permit for any new plumbing tie-in — replacing an existing spigot usually does not. When in doubt, a two-minute call to your local building department saves you a failed inspection.
The backflow rule is non-negotiable and cheap to satisfy: most quality frost-free sillcocks include an integral vacuum breaker on top. If yours doesn’t, a screw-on hose-bib vacuum breaker costs a few dollars and threads onto the outlet. It’s not bureaucratic box-ticking — it’s what keeps garden chemicals and standing hose water from being siphoned back into your home’s supply during a pressure drop.
Buying the right outdoor faucet: what to look for
Buy a frost-free sillcock with a solid brass body, a barrel longer than your wall thickness, a built-in vacuum breaker, and a 3/4-inch GHT outlet. Brass resists corrosion and freeze stress far better than zinc-alloy budget spigots, and the difference in lifespan is measured in decades, not seasons.
At WOWOW Faucet, our fixtures are built with lead-free brass bodies and tested to standard flow and pressure ratings, and outdoor and utility fittings are chosen for the same durability we design into our kitchen and bath lines. When you’re comparing spigots, weigh material and warranty over the few dollars you’d save on a thin-wall zinc model — the cheap one is the one you’ll be re-installing in three winters.
FAQ
Can I install an outdoor faucet myself without a plumber?
Yes — a straightforward outdoor faucet install is a confident DIY job if you can access the interior cold-water line and are comfortable making one pipe connection (soldered, PEX, or push-to-connect). Following an accurate outdoor faucet installation diagram, most homeowners finish in 2–4 hours. Call a pro only if the tie-in is buried in a finished wall or you’re working with old galvanized pipe that needs re-threading.
How much does it cost to install an outdoor faucet?
DIY, expect $30–$80 in parts: $18–$45 for a quality frost-free sillcock, plus fittings, valve, pipe, and adapters. Hiring a plumber typically runs $150–$400 depending on wall access and how far the run is from existing plumbing. A brand-new tie-in with a long pipe run and drywall repair sits at the higher end.
What size pipe do I use for an outdoor faucet?
1/2-inch copper or PEX is standard for a single hose bib and delivers plenty of flow for a garden hose. If you plan to run two hoses at once or feed a long irrigation line, step up to 3/4-inch to avoid pressure drop. Match the pipe to the faucet’s inlet size and use the correct adapter for the transition.
Why does my new outdoor faucet leak from behind the handle?
A leak behind the handle usually means the packing nut is loose or the internal washer/O-ring on the stem needs tightening or replacing — not a faulty install. Tighten the packing nut a quarter turn first. If it still weeps, the joint between the faucet inlet and your pipe adapter may lack enough Teflon tape or be cross-threaded; that connection is the most common outdoor faucet leak point.
How do I keep an outdoor faucet from freezing in winter?
Install a frost-free sillcock pitched slightly downward so its barrel self-drains, and disconnect the hose every fall — a connected hose traps water in the barrel and defeats the frost-free design. For standard hose bibs, shut off the interior valve and open the outside faucet to drain the line before the first freeze. An insulated faucet cover adds cheap extra protection.
Where is the shutoff valve for my outdoor faucet?
The interior shutoff for an outdoor faucet is typically on the cold-water branch feeding it, usually inside the basement, crawlspace, or utility wall directly behind the spigot. If you can’t find a dedicated valve, your faucet may have been installed without one — a common shortcut. Adding a quarter-turn ball valve at the tie-in should be your first upgrade, since it lets you isolate and winterize the line without shutting off the whole house.